Explore REST APIs In Invotide Part 1
Invotide API system allows third party applications to talk to your Invotide store for better integration capabilities.In this article, we will explain how the API works and how to use it. A good progress has been made on the API and although it is by no means the final version, we believe it is a good idea to get familiar with its current state and the way it works.
In this two-part series, we'll explore most of the APIs available and go through the order creation process using them. In this first part, we'll see how to create an API user credentials and some of the basic API usage.
The REST APIs allow third-party systems to interact with the Invotide store seamlessly. How about placing orders in your store using the iOS/Android app? In fact, you could think of any system irrespective of the technology it's built upon! The integration is possible now with the set of APIs provided by Invotide.
In this part, we will demonstrate the usage of APIs using the PHP cURL library. So, you'll need the PHP cURL library installed to run the examples.
Create API User Credentials
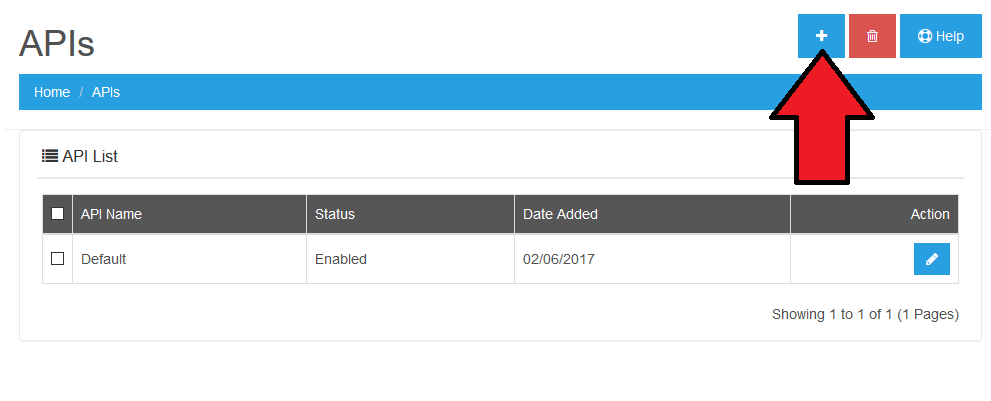
Before we start using APIs, we'll need to set up the "API User" for that. Without that, you can't access it and you'll get a permission denied error. So, let's set that up. Navigate to Configuration > Users > API and it'll list all the API users available.
Click on the + button at the top right to add a new API user.
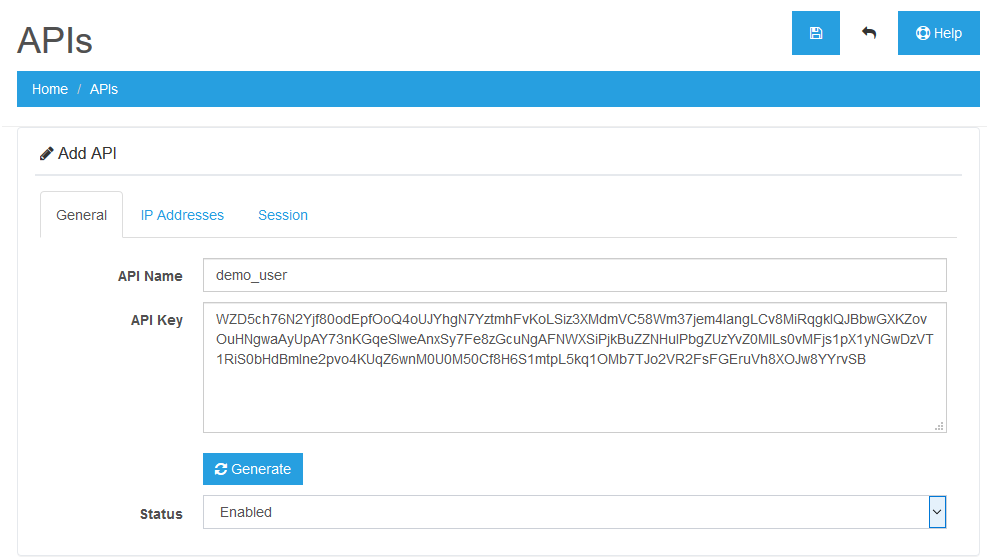
As you can see, you need to enter Username, Password and Status. You could also use the Generate button to create a complex password string, as we have done! Also, make sure that the Status is set to Enabled. Save the changes and you're good to go!
Now that we've set up the API user, we can start exploring the APIs!
Set Up the Common Files
As we'll see the basic core PHP examples throughout this series, let's make sure that we set up the file which includes the common code to avoid any duplication!
Go ahead and create a
common.phpfile and paste the following contents in that file.
<?phpfunctiondo_curl_request($url,$params=array()) {$ch= curl_init();curl_setopt($ch,CURLOPT_URL,$url);curl_setopt($ch, CURLOPT_RETURNTRANSFER, 1);curl_setopt($ch, CURLOPT_COOKIEJAR,'/tmp/apicookie.txt');curl_setopt($ch, CURLOPT_COOKIEFILE,'/tmp/apicookie.txt');$params_string='';if(is_array($params) &&count($params)) {foreach($paramsas$key=>$value) {$params_string.=$key.'='.$value.'&';}rtrim($params_string,'&');curl_setopt($ch,CURLOPT_POST,count($params));curl_setopt($ch,CURLOPT_POSTFIELDS,$params_string);}//execute post$result= curl_exec($ch);//close connectioncurl_close($ch);return$result;}As you can see, it contains just one function,
do_curl_request, which will make a CURL call to the URL passed by the$urlargument. The second argument is an array of parameters in case you need to POST the data.The other important things to note are the
CURLOPT_COOKIEJARandCURLOPT_COOKIEFILEsettings. These set the file in which the cookies will be stored and read from. As we'll need to make authenticated calls, it's a must! Of course, you want to change the path/tmp/apicookie.txtaccording to your system settings. Make sure that it's writable by the web server too!Finally, the function returns the response by the CURL request!
How to Log In
Obviously, the first thing to do is to start the session, and you'll need to use the
loginmethod. Let's have a look at an example. Go ahead and create alogin.phpfile with the following contents.
<?phprequire"common.php";// set up params$fields=array('username'=>'demo_api_user','password'=>'5fbYF8oDteYSJhMQnXuxGB7jx7Ujk7zjJxuCwDSmZx3NJ47ARxW8Je70bYQrfpsfVamVXaMJ4GtHPxnu1ZX41JQN5Vy6V2XwaS6u5dMO6QDArRBc7P7RnriYyancCowlKVTNVUelIKGKmsTBZiPdcYAHX8n6pnSPvNa1wqfQaieKWux6fFZxIYlCstATe02UtFxvhzF82St2Cw0EhfC2rcFwDjQVAowMG1tGDAsIhz8EZa6ngSreD2qZQnqxg8Lm',);$json= do_curl_request($url,$fields);$data= json_decode($json);var_dump($data);First, we've included the
common.phpfile created in the previous section. Next, the$urlvariable defines the API login url of the Invotide store. Next, the$fieldsarray holds the API user credentials created earlier. Finally, we call thedo_curl_requestmethod to log in.If everything is set up correctly, you should see a "Success: API session successfully started!" message in the response.
Congratulations! You've just used the login REST API in Invotide!
How to Add a Product in the Cart
So, now that we've logged in, let's start adding products in our cart! Create a file
add_product.phpwith the following contents.
<?phprequire"common.php";// set up params$fields=array('product_id'=>'51','quantity'=>'1');$json= do_curl_request($url,$fields);$data= json_decode($json);var_dump($data);Again, pretty simple stuff here! You need to pass the
product_idandquantityparameters to add the product into the cart. You should see the "Success: You have modified your shopping cart!" message in case of success!How to Edit a Product in the Cart
Before we move ahead, let's try to understand how Invotide stores the product information in the cart object. Here's how the cart object looks.
stdClass Object(...[products] => Array([0] => stdClass Object([key] => YToxOntzOjEwOiJwcm9kdWN0X2lkIjtpOjUwO30=[product_id] => 51[name] => Demo Product[model] => demoproduct[option] => Array()[quantity] => 1[stock] => 1[shipping] => 1[price] =>$10.00[total] =>$20.00[reward] => 0))...)As you can see, it's stored as an array referenced by the
productskey. Thekeyis also encrypted, so to edit any product entry in the object, you'll need to fetch the associatedkeyusing theproduct_idin the first place!Now, let's see how to edit the quantity of the product in the cart. Create a file
edit_product.phpand paste the following contents in that file.
<?phprequire"common.php";// get list of products from the "Cart"$json= do_curl_request($url);$products_data= json_decode($json);// fetch "key" of the product we want to edit$product_key=$products_data->products[0]->key;// edit the product in the "Cart" using "key"$fields=array('key'=>$product_key,'quantity'=>'2');$json= do_curl_request($url,$fields);$data= json_decode($json);var_dump($data);We've made two CURL calls in the above example. The first one is to fetch all the products in the cart, and the second is to update the quantity of the product already in the cart!
To edit any product, you'll need the
$keyfor the product, and you can find it by fetching the complete products array from the cart session.For the sake of simplicity, I've fetched the key using the
0index directly. But of course, you'll need to find it using theproduct_id.
$product_key=$products_data->products[0]->key;The rest is simple: we're just passing the
keyand thequantitywe would like to update for the product! Again, you should see "Success: You have modified your shopping cart!" in the response to make sure that the quantity is updated properly.So that's it for today. In the next part of this tutorial, we'll see the rest of the examples to create an order!
Conclusion
Today, we looked at the important "REST APIs" feature in Invotide. We went through the process of creating an API user, and later on we explored some hands-on examples to understand the usage of the APIs. Click the link below to view part 2.
http://invotide.com/client/knowledgebase.php?action=displayarticle&id=390